Reset channels to zero in Maya with a hotkey and WH Set Zero script

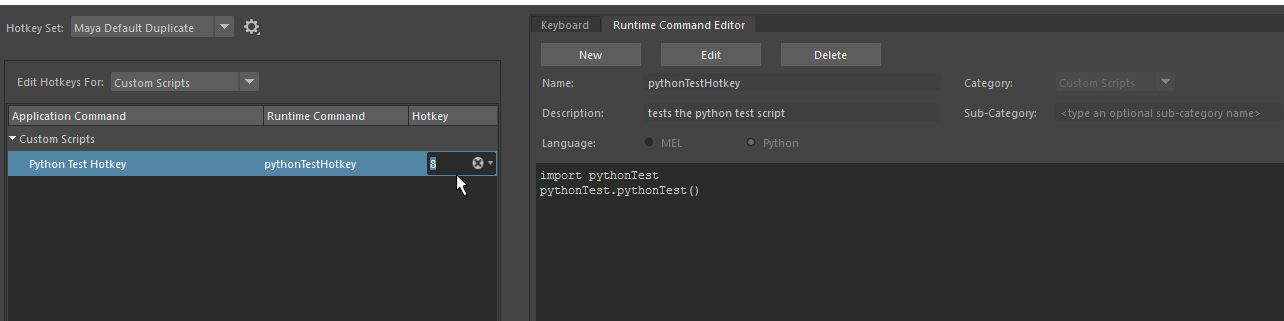
This is one of the scripts I use the most.  It lets you zero out channels with a hotkey. It was written by one of my former work buddies Will Hoag, and you can get it at https://www.highend3d.com/maya/script/wh-set-zero-for-maya.   You will need to register an account with High End 3d to download the script, but it’s free.

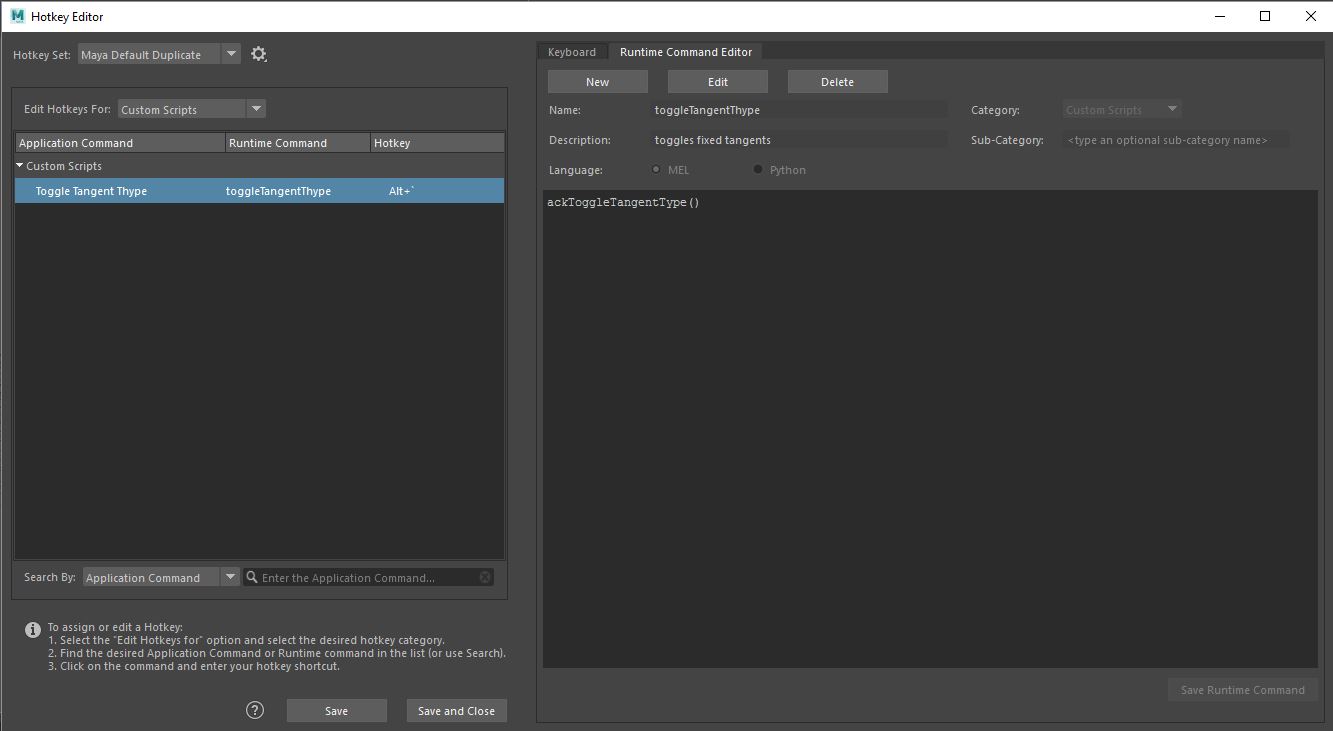
Once you’ve gotten and installed the script, open your Hotkey Editor and make a new custom script with the Runtime Command Editor.  Make it the mel command ‘whSetZero’ and assign it a hotkey.

Now select an item in your viewport and hit your key.  Translation and rotation channels for the selected object will be set to 0 and scale and visibility channels will be set to 1.  If you select channels in the channel box, only the selected channels will be affected, so it’s an easy way to zero out only rotations or translations while leaving the other attributes as they were.  One quirk of this script is that if you select only one channel and try to zero it out, all channels will be reset, but if you select two or more, the script will reset the selected attributes.

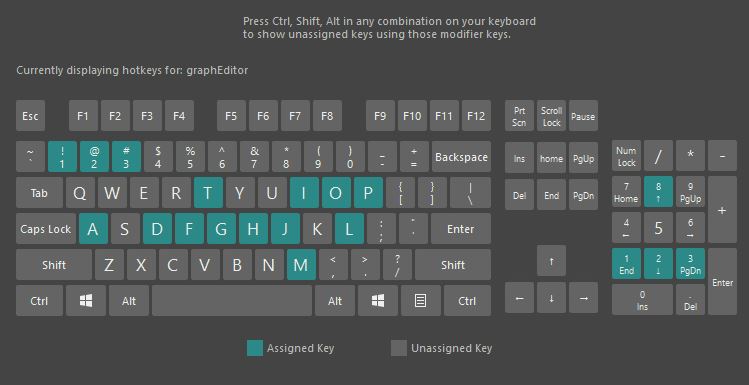
Where this script really shines is in the graph editor.  If you select a key on a curve and hit your hotkey, that key will be reset.  If you select multiple keys, it will zero all of those keys.  If you select a whole curve, it will zero all the keys on that curve.  This can let you make certain adjustment very very quickly.  This one is a little hard to show in pictures, so if this doesn’t make sense, or you don’t want to try it out yourself, I recommend watching the demo.

This script also works on multiple objects, so it’s handy if you need to set a rig back to its initial position.  You can just select all the controls, hit your hotkey, and you are set.

Thanks again, Will Hoag.  I couldn’t live without this one.

K for Time Dragger Tool and I for Insert Key Tool in Maya

Two hotkeys today that come standard with Maya straight out of the box.  Sort of.  More on that later.

K: The Time Dragger Tool

Normally to scrub you have to drag inside the timeline, but if you hold down K, the Time Dragger Tool is activated.  With K held you can left-mouse-drag left and right in any panel to scrub through your animation.

If you’re doing this in a viewport, you’ll be restricted by the range that you’ve set, but if you K+left-mouse-drag in the graph editor, you can scrub outside of the range, which can be very handy for checking animation without constantly resetting your time slider.

I: The Insert Key Tool (Maya 2016 and Earlier)

Sometimes adding keys with the S key can put some kinks in your curves as Maya tries to insert a key with your default tangent types.  If you want to add a key and preserve your curve exactly as it is, select the curve in the graph editor and hold down I to activate the Insert Key Tool.  With I held, middle-mouse-drag over your curve.  You will see a yellow marker appear, and when you release the middle-mouse-button a new key will be placed without changing the current animation.

Workaround for Insert Key Tool in Maya 2017:For

For some reason, in Maya 2017 there is a new default hotkey for I in the graph editor for the command “Graph Editor Display All Tangents.”  Even after I deleted this key, I couldn’t make I work the way it had in previous versions.  The only workaround I could find was to assign a new hotkey to this function.

To do this, open your Hotkey Editor and Edit Hotkeys For: Other Items. Open the tools category.

Scroll down to find Insert Key Tool Activate, and Insert Key Tool Deactivate.  Choose something other than I and assign it to these commands.  I chose M.

In the small dropdown, make sure that Insert Key Tool Activate is “on press” and Insert Key Tool Deactivate is “on release.”

Now the Insert Key Tool will work as it has in previous versions, only with the new hotkey.

Creating hotkeys to quickly edit tangent types in the Maya graph editor

Now that the basics have been covered, I’m going to start showing some things I do to speed up my personal workflow, starting with some hotkeys that are very useful when using the graph editor.

I really dislike going up to the to toolbar at the top of the graph editor every time I want to change a tangent type.  Fortunately, the buttons I use most can be assigned to hotkeys for very quick changes.

Open the hotkey editor, and from the drop down boxes next to “Edit Hotkeys For:” select “Editors” and “Graph Editor.”

If you scroll to the bottom you can find tangent types.  I set mine up so Alt+1 is Tangent Spline, Alt+2 is Tangent Linear, Alt+3 is Tangent Flat, and Alt+4 is Tangent Auto.  I rarely use other tangent types, so these four hotkeys work for me 99% of the time.

One other thing I do all the time is break and unify my tangents.  To do this with a hotkey, I use a script from Aaron Koressel.  Specifically, at the bottom of his Workflow Scripts page, you can find a script named ackToggleTangentType.

Download this script to your maya scripts folder, rehash so you don’t have to close and re-open.

Back in your hotkey editor, go to the Runtime Command Editor and make a new runtime command.  Give it a name, set the language to Mel, and give it the command “ackToggleTangentType()”

Save Runtime Command and assign it a hotkey under Edit Hotkeys For: Custom Scripts.  I use Alt+`, which is the ~ key just to the left of the 1 key.  Now this hotkey will toggle your tangents between broken and unified.  If you use weighted tangents like I do, this will also free your tangent weights.  I used to have a separate hotkey to free tangent weights, but a double-tap of this one will free and re-unify the tangents, so now I just use this.

Hopefully that’s helpful.  With a little practice, this will help you alter your keys with much more speed and much less distraction than going to the toolbar every time you want to make a change.

Overview of the Hotkey Editor in Maya – The Basics

This is the last of my basic tutorials, so if in the future you get lost wondering how to make a hotkey or a button or where to put a script so Maya picks it up, you can just refer back to these first three and get a reminder.  I won’t be getting into anything much crazier than you see in these first three videos, I’ll just be using these few techniques for a lot of different things.

You will find the Hotkey Editor under Windows > Settings/Preferences > Hotkey editor.

On the right side you will see a map showing keys that are in use as hotkeys.   They show up in teal.
hotkeytealmap

This map will update itself as you press Ctrl, Shift, Alt or when you go into hotkeys for specific editors, like it can be seen doing here while showing the hotkeys for the graph editor.
hotkeygraymap

Looking to the right, we have some options to go through.  The first is the menu category.
menuitems

This is where you can assign or edit hotkeys for the menus at the very top of the program.  Maybe you want to change the key for Save as, or Undo.  For this example I chose to add a key to a menu item that doesn’t already have one.  I made it so ‘m’ will open my Graph Editor.  mwarning

You can see that I’m given a warning because another command is using ‘m’ as a hotkey.  It’s not a tool I ever use, though, so I’m fine to continue.  If ‘m’ has an on-release command, you may also see a warning for that.  You can click through them both.

Now I’ve chose, our next category: Editors (1.).  It shows up blank, so I’ve selected the Graph Editor (2.)editors
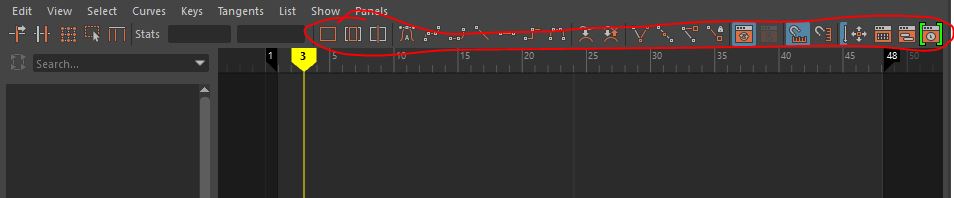
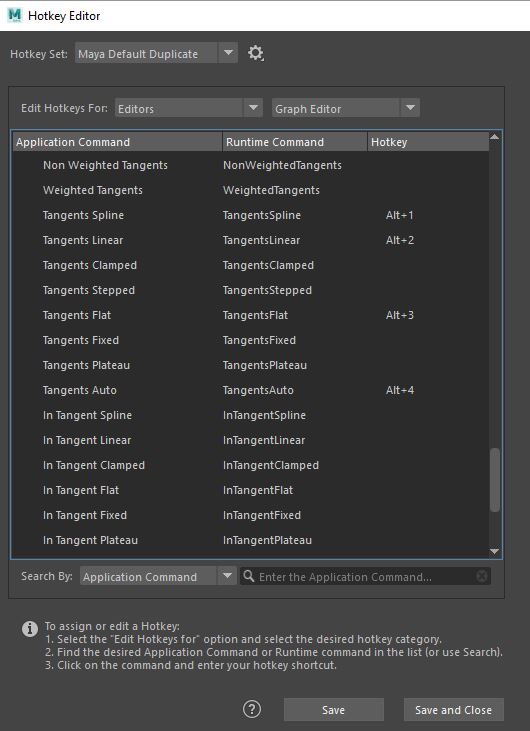
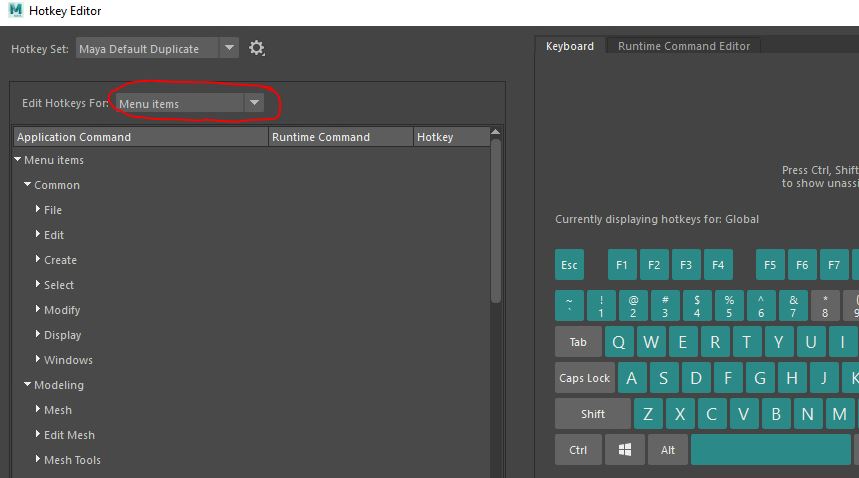
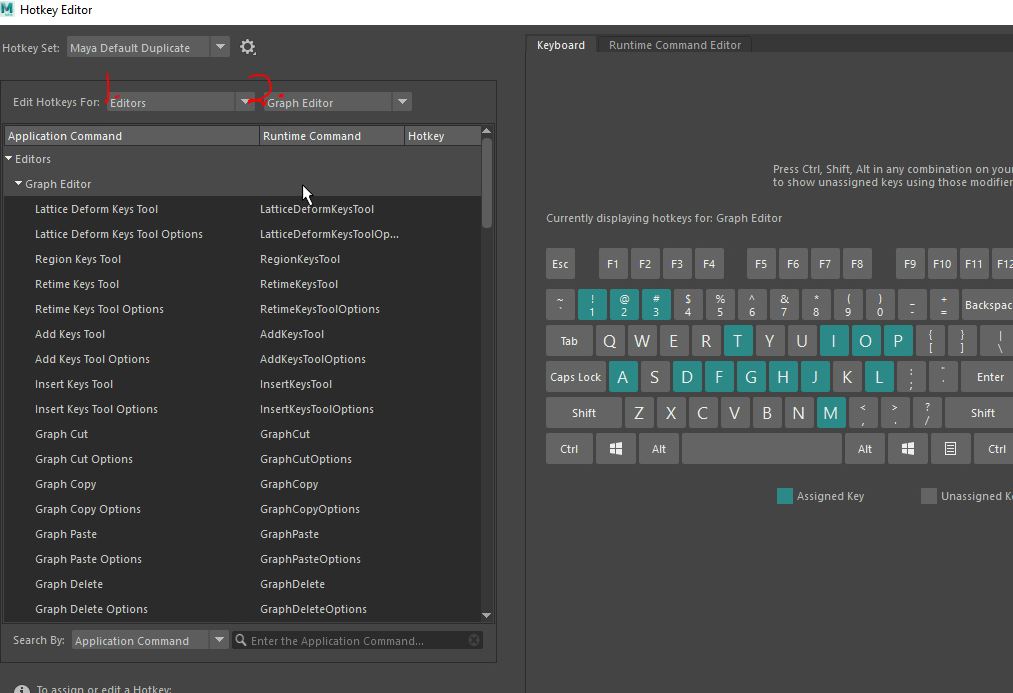
This is where I can edit all the hotkeys for tools and commands that are specific to the graph editor.  It’s also a good place to look for tools that could be useful but that I might not otherwise have known existed.

The third category is “Other Items” which is just a catchall for things that aren’t on menus or aren’t specific to an editor.  It’s also a great place to trawl for unknown, but helpful, tools.   otheritems

Time for category four, Custom Scripts (1.)  I use this more than the other three combined.  It lets you enter in some code, either MEL or Python that can then be assigned to a hotkey.  It can be a call to one of your scripts in your scripts folder or it can be the whole script itself, depending on how the script was written and your personal preference.  To set up a script for use, click on the “Runtime Command Editor,” tab (2.), and then click “New” (3.)  This will then allow you to type in the rest of the boxes below.  Enter a name (4.).  The name is a mandatory field and has to be unique in your scene.  It can also only contain letters, numbers and underscores.  The description (5.) is optional, but a good idea.  When you accumulate a bunch of these, you’ll be glad you kept notes.    (6.) Select the appropriate language, (7.) paste or write the code and then (8.) save.
runtimecommand1

Now that that’s done, your runtime command will show up on the left, and you can finally assign a hotkey to it. I chose “8,” since it was otherwise unoccupied.  Now every time I hit “8,” my test script runs.
pythontest8

If you’re looking for the NURBS-toggle MEL script from my other example in the video, here it is:

string $panel = `getPanel -wf`; modelEditor -e -nurbsCurves ( !`modelEditor -q -nurbsCurves $panel` ) $panel;

Finally, these menus can be tricky to navigate and a little daunting, so if you don’t see what you’re looking for, there’s a search in the bottom left corner.
search

Now you should be able to make hotkeys like a pro.

Using rehash for MEL scripts and import for Python scripts in Maya

I’ve only put up one instructional video and already I need to make a correction.  In my previous post I said that the rehash MEL command would load any scripts that have been dropped into Maya’s scripts folder.  It turns out, that’s only half true.  It works for MEL scripts, but not Python scripts.

If you’re loading a MEL script, or several, just put them in the correct folder, type ‘rehash’ into the MEL command line or script editor:
rehash
MEL script(s) will now be sourced by Maya, meaning you only have to follow the instructions that come with the individual scripts to run them.

With Python it is a little trickier, but not bad.  First you need to import.  Switch to the Python command line or go to a Python tab in the script editor, then type “import <filename>”  In this case, or test file is pythonTest.py.  You can leave the .py off, so your input should look like this:
import-python

Once your script is imported, you can then run commands from it.  This time you’ll type <filename>.<command>.  For our test, they are the same, so the command is pythonTest.pythonTest().  Note that you’ll need the parentheses for this one, but you don’t in MEL.
pythontest

One bothersome thing about the Python scripts is that they have to be reloaded each time you start Maya.  This is easy to work with, though.  If you have a script you use a lot, just make a button that has the import command on one line and the function you want to call on the second line.  Here is what it looks like for my example.
pythonbuttonexample
Now just middle-mouse-drag that text to the shelf and you’ll have yourself a button that will import and run the command any time you want.


How to run scripts, source scripts, and make buttons in Maya

This is an extremely introductory lesson. If you’re familiar with using scripts already, you probably don’t need to read or watch.

I’m starting with a fresh install of Maya 2017 so you can see in these lessons how I set it up to accommodate my workflow.  First I’m going to take care of a couple of quick things that I always forget.  I’m going to turn on autokey:
autokey

And I’m going to change my undo queue in settings from the default 50 to infinite:
undo

Alright, now lets talk about scripts.  There are two types we’re going to deal with, code snippets that run inside Maya, and sourced scripts that are stored externally.

This button will bring up your script editor:script-editor-icon

Once open, you’ll see tabs on the bottom half of the window, one for mel one for maya.  When you download a script you’ll know which is which because the file name will end in ‘.mel’ or .’py’.  Right now we don’t have to worry about it.  You can see I’ve entered a line of code into the mel window.  To run this code, highlight it and then click the execute button (it’s under the mouse and looks like a play button) or hit ctrl+enter.
script-editor

Another way to run a line of code is to enter it into the command line at the lower left.  Right now it is primed to accept mel commands, but if you click where it says ‘MEL’, it will toggle between mel and python.  Enter your command and hit enter.  If you click so your cursor is in the text field, you can also use the up arrow to navigate back to previous commands.
commandline

To save some code as a shelf button, highlight it and middle-mouse drag it to the shelf.
middle-mouse-drag

To source scripts, you need to put them in your Maya folder.  By default it can be found here (according to my own experience or Google.  If it’s not there on a Max or Linux machine, you might have to look around:
Windows – C:\Users\<username>\Documents\maya
Mac – /Users/Shared/Autodesk/Maya
Linux – /usr/people/<username>/maya

From there you can put a script into the scripts folder if you’d like it to be accessible to all versions of Maya you have installed.
C:\Users\<username>\Documents\maya\scripts\

If you want to have the script only accessible to one version of Maya, click on the folder corresponding to the version you’re using and put it in the scripts folder there, or prefs/scripts.   Either should work. For example:
C:\Users\<username>\Documents\maya\2017\scripts
C:\Users\<username>\Documents\maya\2017\prefs\scripts

A downloaded script will usually have a readme with instructions or instructions embedded in the code.  Open it with any code editor and look at the top for instructions.  For this example I’ve highlighted the pertinent information.
arctrackerinstructions

For your newly placed script to be visible to Maya, you either need to close and restart the program or type the command ‘rehash’ into the MEL command line.*   After that just follow the instructions to get things started.  In this case type ‘arctracker108’ into the command line and the scripts GUI should appear.  If you highlight and middle-mouse drag that text to a shelf, you now have a button that will load the arctracker108 script any time you need it.

You can try this out with any script, but if you want to use the same specific one, you can find it here: https://www.creativecrash.com/maya/script/arc-tracker

That’s it for today.  The last major way to run scripts is with hotkeys, which I’ll be going over next time.

*UPDATE: the ‘rehash’ command only works to refresh MEL scripts.  Python scripts must be imported differently and that is covered in the next lesson